21 February, 2026
Skipped College. The day was good overall!
Today I:
- Solved 4 LeetCode problems (including the POTD)
- Learned more about Docker(layers, networks and volumes)
- Studied Compiler Design (basics)
- Learned Stacks(using vectors, linked lists, and c++ stl)
I hope you find it informative and useful in some way, especially the what I learned? part below.
What I learned?
Layers In Docker
They are a fundamental part of the image architecture that allows Docker to be fast, efficient and portable. A docker image is built via a series of layers that we add on top of the previous ones.
In our last devlog, we saw a dockerfile we created to dockerize our basic node app, let's take a look at that again! github-repo
# base image
FROM node:22-alpine

# select working directory where code will be copied
WORKDIR /app

# copy dependency files
COPY package*.json .

# install dependencies
RUN npm install

# copy other files
COPY . .

# expose desired port
EXPOSE 3000

# this command runs when you run the docker image
CMD ["node", "index.js"]
Here, there is a base layer that is the node image, then the working directory layer, dependencies and installation layer, the source code layer and finally our Port layer. The last command "node index.js" is not a layer, its a command that will execute on running the image.
Why do we need or use layers?
Well one of the most important reasons is CACHING. When we build our docker image, it basically caches the layers, and uses it for the future builds.
In other words, if we change something in the source code of the application, and rebuild the image, the whole image won't be built again, the layers before copying the source code would be already cached, and only the layers that come after the modified layer will be built again. This is why we copy package.json separately before copying the source code — so dependency installation can be cached.
This makes building and sharing images very efficient.
Now let us understand using the dockerfile we have made earlier, assume we build the image for the first time, and then we change something in the source code of our application, to update our image we will have to rebuild the image. As a result, all layers before the COPY . . step will be cached, and only the layers after it will be rebuilt.
Network and Volumes in Docker
These are the concepts that become important when you have multiple containers running on your host machine and want to persist data across container restarts or make the containers communicate with each other.
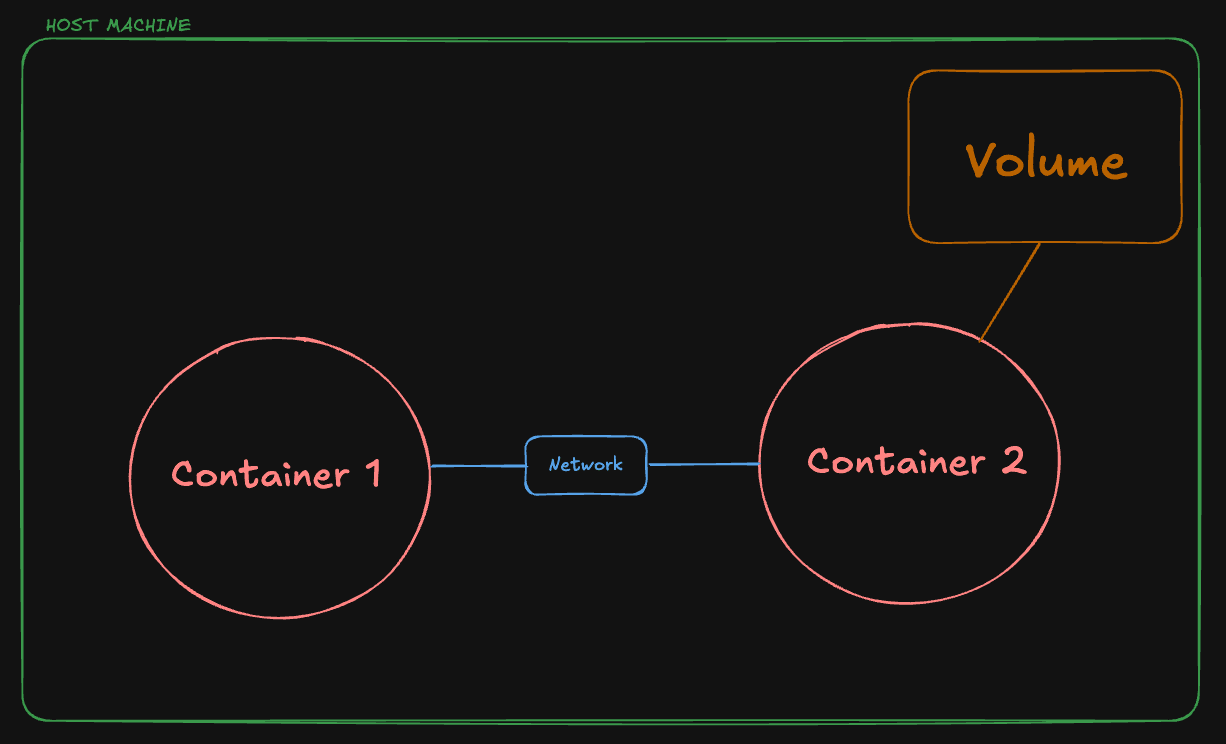
Volumes
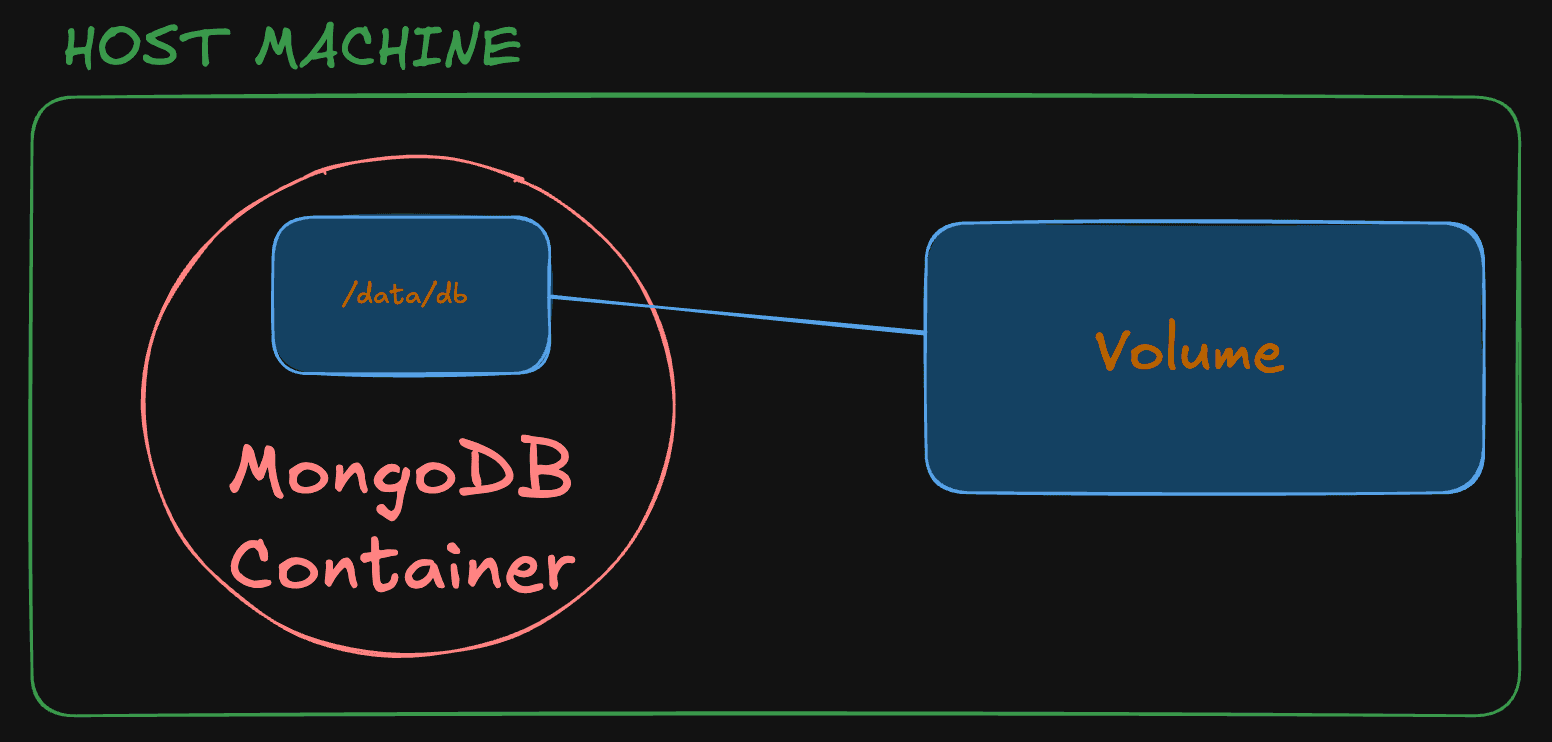
What actually happens when we kill a docker container? Everything is lost, i.e. its filesystem and data, everything is lost, it does not persist on its own. So let's understand it by taking an example, assume that you are running a MongoDB container locally and working on a project, but whenever you kill the container, the data is lost and hence you will have to insert data everytime you restart the database container and this is very tedious.
So to make the data persist, we will use Docker Volumes and mount that volume with the data directory of our container. Let's see the commands to see how it works.
# create a volume
docker volume create volume_database
# start the container
docker run -v volume_database:/data/db -p 27017:27017 mongowhat we have done in the second command is, we mounted the data directory of the mongo container to the volume , so now the volume and the container data will be in sync, and even if you kill the container, the data will persist and can be used whenever you restart the container using the above command.
Networks
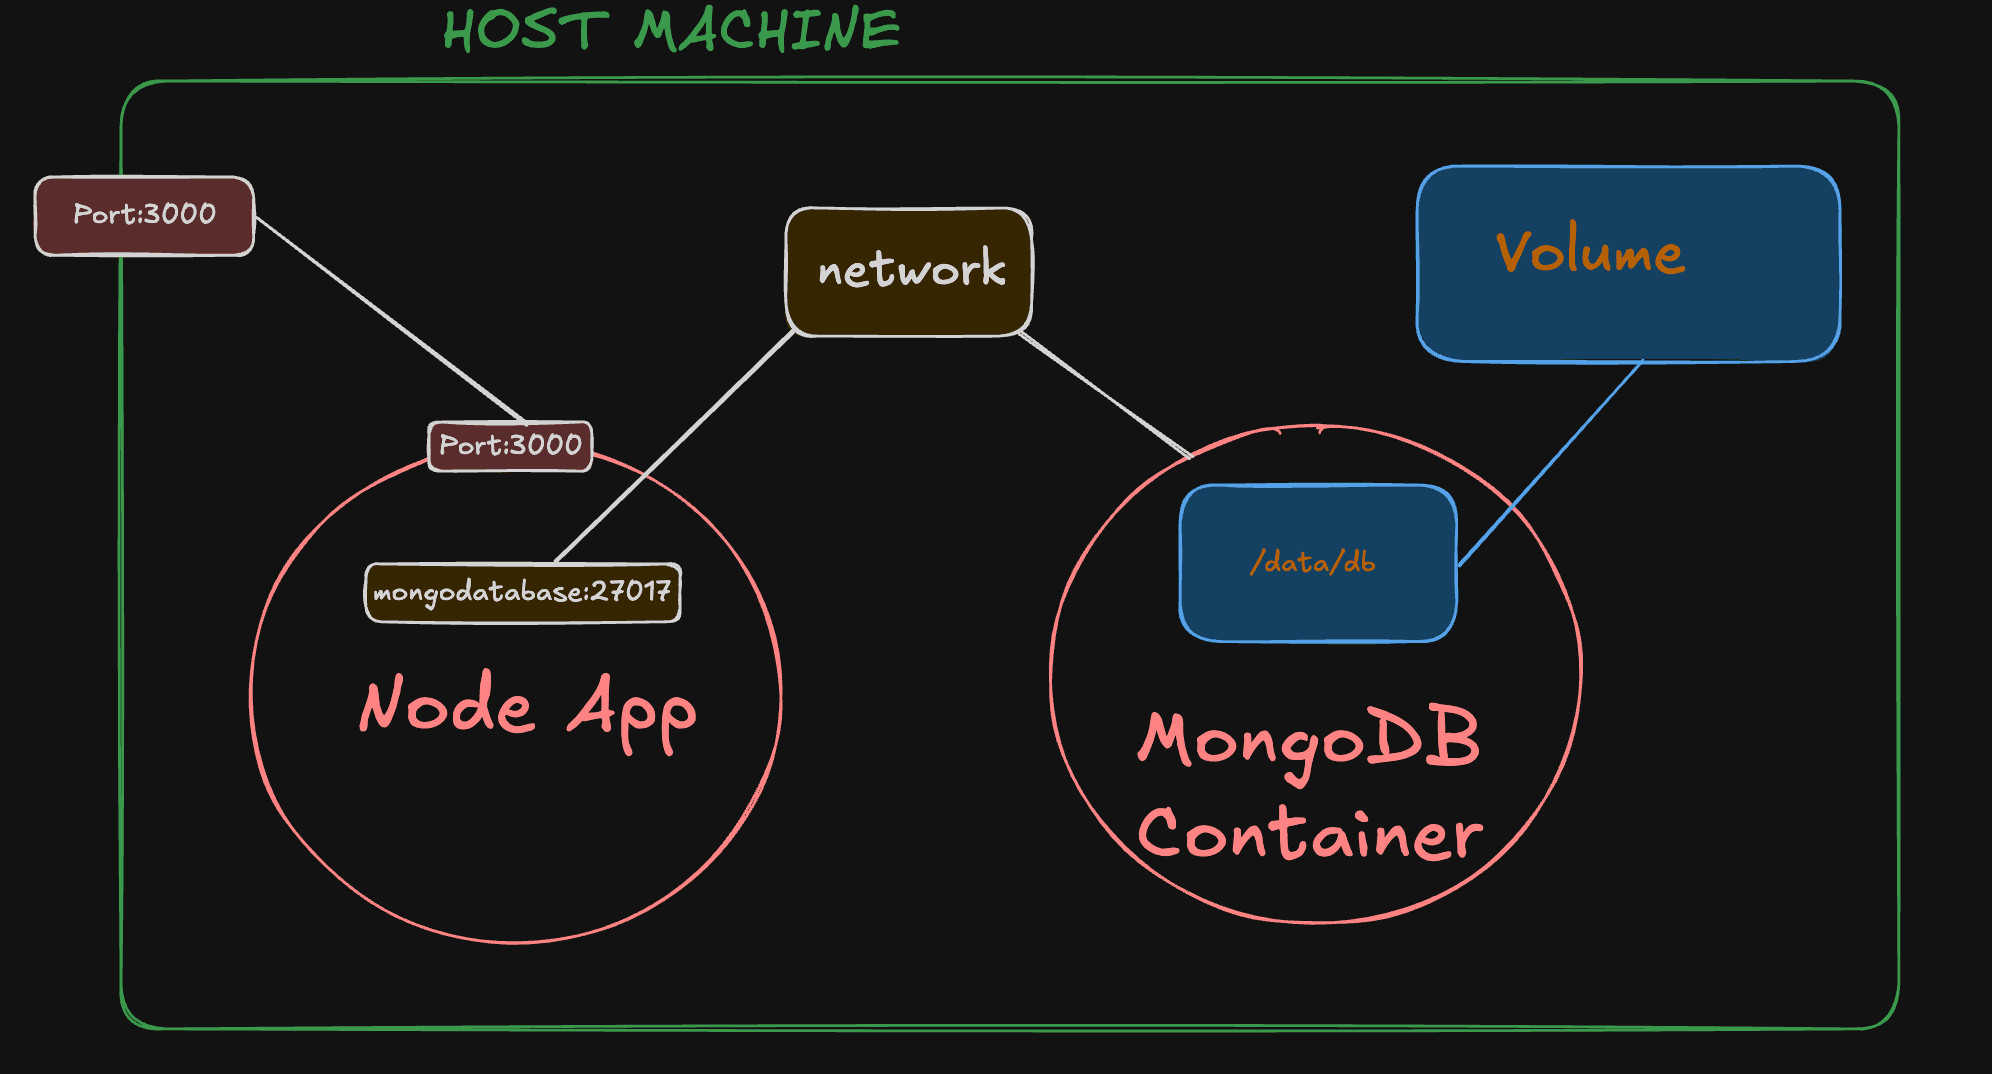
Network is a powerful feature in Docker, it lets you make different containers running on your host machine communicate with each other. Remember localhost on a docker container means its own network, not the host machine's network.
So, how do we make the containers communicate with each other? First let's see how to do so, and then we will take an example and understand the flow. Step 1, we create a docker network, using the following command
docker network create <network-name>Step 2, we name the docker container to which we want to communicate through our other container and also connect it to the network we just created, using the following command
docker run --name <name-container> --network <network-name> -p <portmapping> <image-name>Step 3, we use the name we gave to our container in our source code, instead of using localhost or whatever, and rebuild its image. Step 4, we start the container and connect it to the same network, using the following command.
docker run --network <network-name> -p <portmapping> <image-name>And done! We have successfully created a docker network and connected our containers over it.
Now let's take an example of a basic node application, that needs to be connected to MongoDB. But both, the application and MongoDB are running in different containers. So, as we saw earlier, we will create a network, then name our mongo container and connect it to that network, update the mongo url from the source code and rebuild the image, and then run that image's container and connect it to the network.
Here we go,
# create network
docker network create node_network
# run mongo container and connect to the network with a name.
docker run -v volume_database:/data/db --name mongodatabase --network node_network -p 27017:27017 mongo// change the mongo url from
const mongoUrl: string = 'mongodb://localhost:27017/myDatabase'
// to
const mongoUrl: string = 'mongodb://mongodatabase:27017/myDatabase'# build or rebuild the image
docker build -t node_app .# run the image's container and connect to the network
docker run -d -p 3000:3000 --name backend --network node_network node_appAnd, done! We successfully connected our app container with the mongo db container.
What I learned?(DSA)
Stacks
This is a LIFO based linear data structure, LIFO stands for Last In First Out, i.e., the last element that is added to the stack is the first one that will be taken out.
We can implement stacks with arrays, vectors, linked lists, we also have c++ stl implementation of stacks
It has basically 4 functions all of them are implemented in constant time complexity. These functions are push, pop, top and empty.
stack.push(value); // push a value to stack
stack.pop(); // pop top value
stack.top(); // return top value
stack.empty(); //return true if empty, false is not empty
Vector implementation
#include <iostream>
#include <vector>
using namespace std;

class Stack{
    vector<int> v;

    public:
        int top(){
            return v[v.size()-1];
        }
        void push(int val){
            v.push_back(val);
        }
        void pop(){
            v.pop_back();
        }
        bool empty(){
            if(v.size() == 0){
                return true;
            }
            return false;
        }
};


int main(){
    Stack s1;
    s1.push(10);
    s1.push(20);
    while(!s1.empty()){
        cout<<s1.top()<<" ";
        s1.pop();
    }
    cout<<endl;

    return 0;
}
Linked List implementation
#include <iostream>
#include <list>
using namespace std;

class Stack{
    list<int> ll;

    public:
        int top(){
            return ll.front();
        }
        void push(int val){
            ll.push_front(val);
        }
        void pop(){
            ll.pop_front();
        }
        bool empty(){
            if(ll.size() == 0){
                return true;
            }
            return false;
        }
};


int main(){
    Stack s1;
    s1.push(10);
    s1.push(20);
    while(!s1.empty()){
        cout<<s1.top()<<" ";
        s1.pop();
    }
    cout<<endl;

    return 0;
}
STL implementation
#include <iostream>
#include <stack>
using namespace std;

int main(){
    stack<int> s1;
    s1.push(10);
    s1.push(20);
    while(!s1.empty()){
        cout<<s1.top()<<" ";
        s1.pop();
    }
    cout<<endl;

    return 0;
}